
In this post, I want to give you a little introduction on how to apply the DVOs in SCRATCH. There are two ways and two locations to load and apply them.
Let’s first look at how to load them onto a single shot:
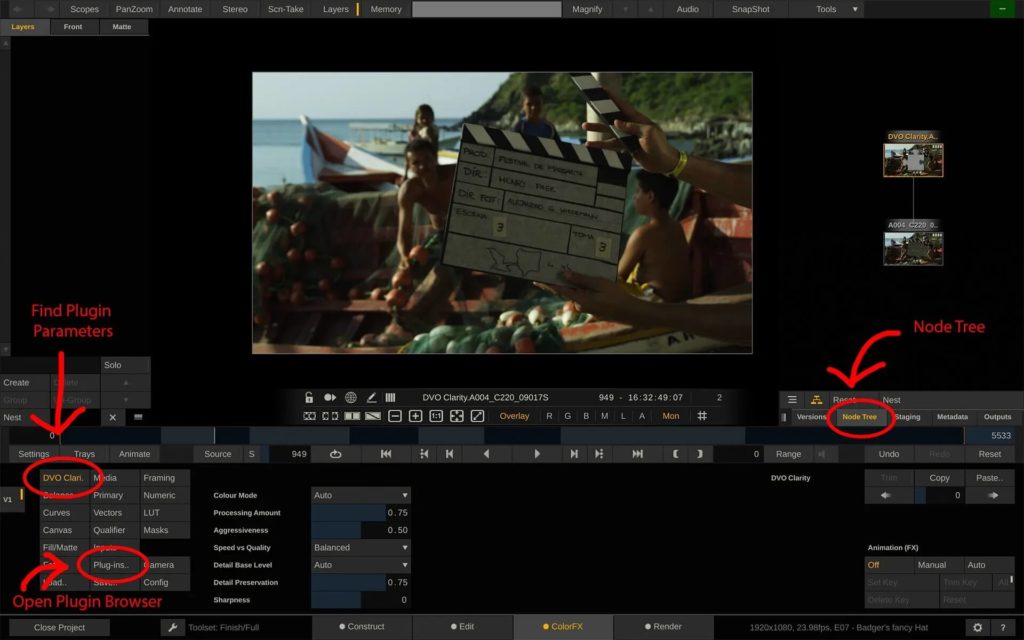
After loading a bunch of shots, or conforming a timeline in the Construct tab, go to the ColorFX tab, where all of the color action takes place. In here you’ll find the “Plug-ins..” button on the left. Clicking it will open the plugin browser and you can navigate to one of the DVOs.
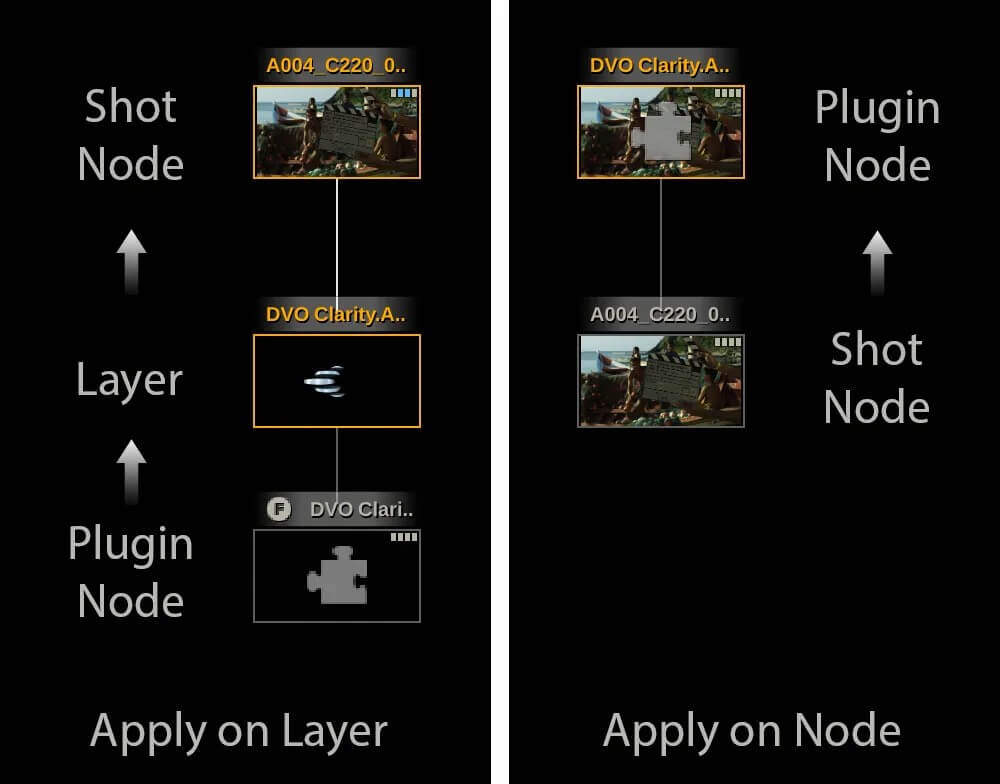
Now SCRATCH offers you two ways of applying the selected plugin: Either to add it onto a layer on the current node, or to add it on top as a new node.
What does that mean? It’s fairly simple: Underneath, SCRATCH uses a node structure and you can choose whether to feed the plugin into the current shot (-node), or you can instead choose to feed the current shot (-node) into the plugin node.
This becomes much more clear, when looking at the node tree: Swipe to the right to bring up the Version stack and at its bottom, switch to the “Node Tree” tab.
Now, when do you choose to add a plugin onto a layer of the current node vs. adding it on top as a new node? It mainly depends on your way of working, and whether the plugin makes use of temporal filtering: Temporal filtering does not work well on layers.
Plugins that use temporal filtering – like DVO Pixel, or DVO Clarity – should always be added as a new node on top and never onto a layer.
What is “temporal filtering”? Let’s start with the opposite: Spatial filtering. With spatial filtering, the plugin only needs one frame, analyze that and apply the plugin effect to it. For the next frame, it’s rinse & repeat.
With temporal filtering, the plugin needs to take multiple frames before and after the current frame into account, in order to calculate the plugin effect on the current frame. This is most prominently the case with noise reduction: To actually know what the noise in a shot is vs. the actual image content, DVO Clarity needs to analyze multiple frames in order to detect the noise that it’s going to filter out.
Another advantage of adding a node on top is that we can cache the input of this node (which includes the actual effect of the plugin-node – i.e. denoising) by going to the Media menu and pressing the “Cache Input”-button in the lower right corner of the screen.
Any other plugin, that does not make use of any temporal filtering, can safely be used on a layer. This also is the way most colorists prefer to work in SCRATCH: On one single node with a multitude of layers on it.
Before we move on to applying plugins to whole timelines, let’s look at how to change plugin parameters in SCRATCH. You will find them in the Node menu – that however is labelled dynamically, depending on the underlying node. It’s the menu button in the upper left corner of the ColorFX menus. When no grade is applied, or you have the primary layer selected in the layer stack, it will show the controls of the underlying shot node – in case of a RED RAW clip, this would show the debayering settings for RED RAW. In case of an ARRI RAW shot, it would show the debayering controls specifically for ARRI RAW. Now, when you are on a plugin node, or a layer that has a plugin loaded onto it, this menu will show the plugin controls – and be labelled with the plugin name.
Now there are scenarios, where we want to apply a plugin to all of our timeline.
Be it for creative purposes, or just for transcoding and doing a noise reduction pass. For those cases, plugins can be added to the timeline as a whole inside the Render tab in SCRATCH. So let’s go there and take a look at our output tree.
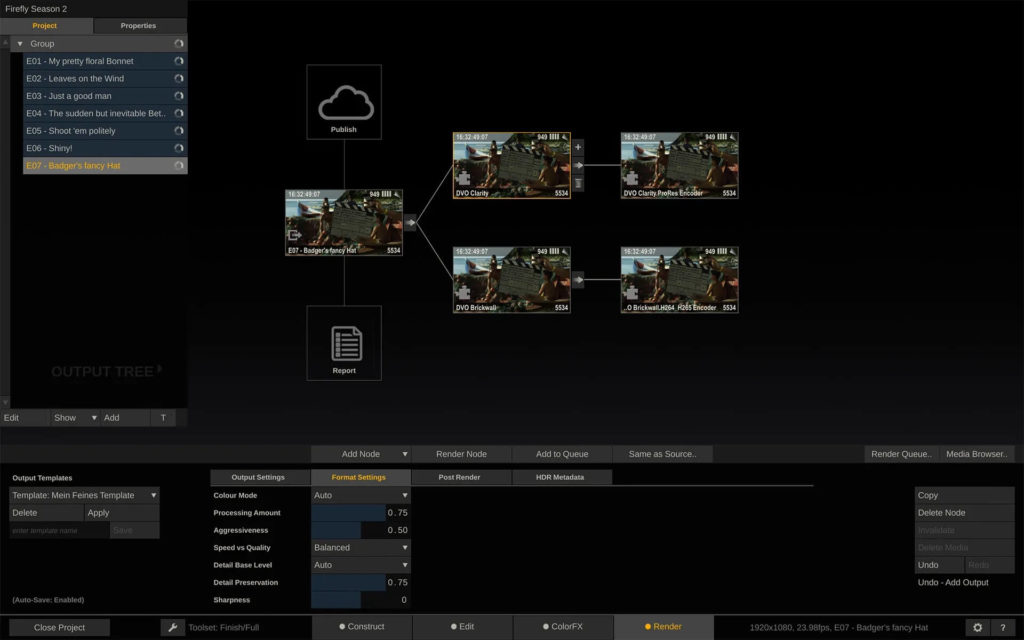
It starts with the main output node on the left – that node represents our timeline in terms of resolution, frame rate and aspect. By hitting the plus icon, we can add a so-called Transformer node. Transformer nodes can do various things: Change the resolution, bit depth, color space & EOTF, but can also apply a grade across the timeline. We can enter and work on the just added Transformer node by just double-clicking it. We’ll be taken back to ColorFX and can now add any of the DVOs in the known two ways. Adding a plugin as a layer now will indeed to that: Add it as a layer onto the Transformer node. However, that will ‘hide’ it in our output tree structure on the Render tab.
The only clue is the barcode indicator on the thumbnail of each node, showing that a ‘grade’ of some sort is applied on this node.
So let’s remove the Transformer node again from the output tree and instead double-click the main output node and in ColorFX add DVO Clarity as a new Node on top. We will find the plugin controls in the node menu, just like we did before. However, if we now exit back to the Render tab, we can see that the DVO Clarity node has been added behind (or better: downstream) from the main output node to the output tree. That makes it very clear to see where in the output tree the plugin has been added.
Behind the DVO Clarity node, we can now add for instance a ProRes encoder node, or an Image node to render OpenEXR.
We can also go back to the main output node and add another plugin, like DVO Brickwall as a node on top and then back on the Render tab, add an H264-encoder behind that.
DVO Brickwall takes care of high frequencies, which can cause artifacts with H264 encoding, so it does make a lot of sense being used as a pure ‘output tree plugin’.
If we want to change the plugin’s parameters, we can do it in two ways: Either right inside the Render tab, if we select the plugin node and below go to the “Format Settings” tab of that node, or, in case we need to judge the image while dialling in the plugin parameters, simply double-click the plugin node to be taken back to ColorFX with it.
That’s it for using DVO Plugins inside SCRATCH – if you have any questions, feel free to contact Assimilate support at support@assimilateinc.com.
