
This is part one of a three-part introductory series to color grading by Chris Packman, Head of Grading at The National Film and Television School. This series of articles is intended for those at the beginning of their color grading training.
To begin, let’s review color space in the film and television industry.
Color Space
The range of visible wavelengths runs from ultra-violet to infra-red.
In this diagram, we can see the difference in color space size of the various TV and film systems in use today.
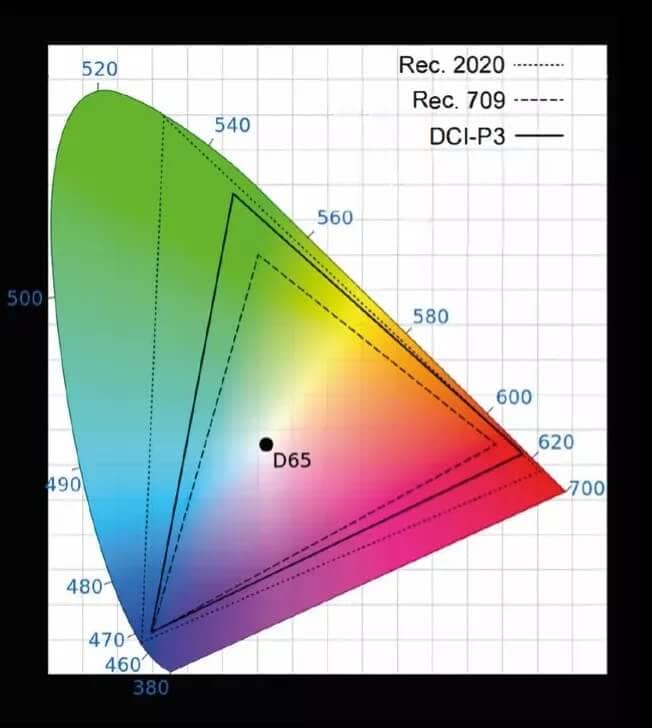
- Rec709 is HDTV color space
- DCI-P3 is projection color space
- Rec2020 is UHD/ HDR color space
- D65 is the common white point used by most systems
For those interested in further reading about colorimetry in film and TV, check out Color Reproduction in Electronic Imaging Systems: Photography, Television, Cinematography by Michael S Tooms
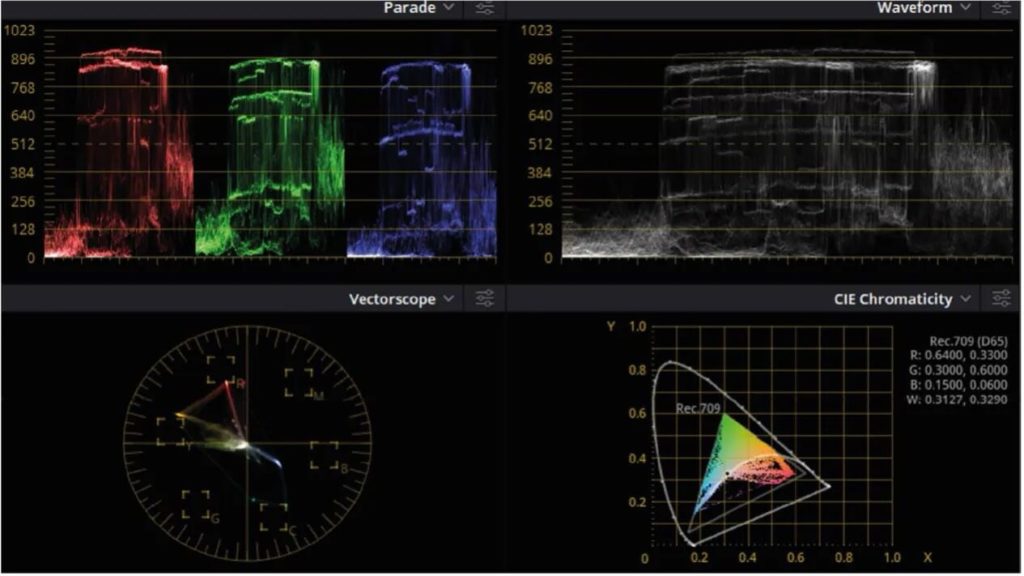
Video Scopes
Video scopes show in detail the parameters of the video signal. By looking at the parade and luminance displays we can see such faults as black clipping, white clipping, and excess lift. Saturation and gamut problems can be seen by using the vector display.
Color scaling: Legal and full range
In the 10 bit system, black is represented by the value of 64, white is 940. This is said to be legally scaled (Nucoda Video SMPTE). If the full extent of the signal is used from 0 to 1024, the signal is said to be fully scaled (Nucoda Full Range).
If a legal range signal is replayed as full, the resultant playback will have lifted blacks and a loss of contrast. If a full range signal is replayed as legal range, the resultant playback will have clipped or crushed blacks and whites, and an increased contrast.
It is essential that the correct color scaling is used for the playback of a file, otherwise sever problems will be caused to the playback.
Log and lookup tables
Many of the images we work with today are in log format. Recording the images in this format enables extra detail to be retained for use later in the grade. Log images uncorrected look flat and desaturated. Bringing them back up to normal is often achieved by using a lookup table or a LUT.
Camera LUTs
Camera LUTs are often supplied by the camera manufacturer as they know the full details of the hardware being used. They are usually downloadable from the manufacturer’s website.
Artistic LUTs
Artistic LUTs are easily created by grading software and may be supplied to the dailies colorist or the offline editor to give the offline edit the look the cinematographer and director are intending.
LUT Formats
Some examples of different LUT formats can include:
- DaVinci Resolve (.cube)
- Nucoda (.cms)
- Arri look file (.ami)
For conversion between the different formats Lattice (Mac) and Grossgrade (Win) are recommended.
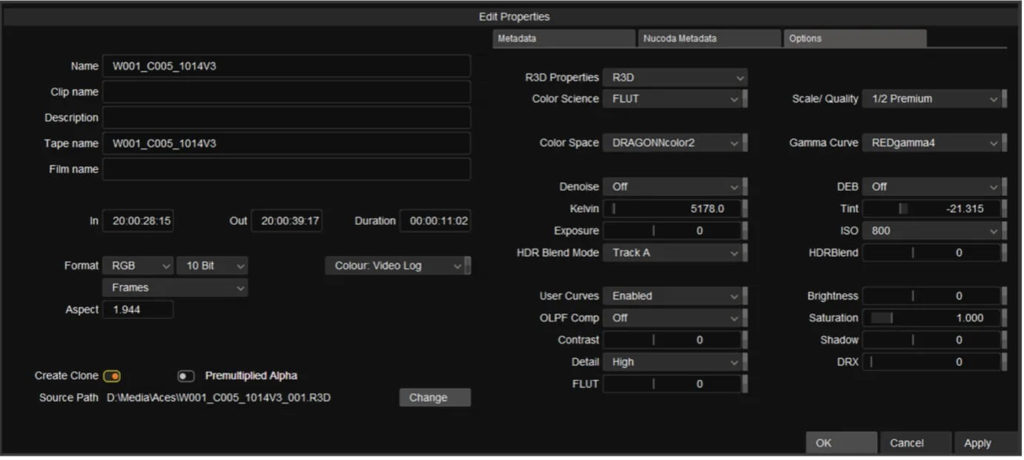
RAW files
RAW files are video files generated by cameras capable of saving the raw sensor data. When imported into a grading system, this data is highly pliable in grading. Cameras capable of exporting RAW include the RED system and the Arri Alexa.
A RAW file contains considerable amounts of data when unpacked. The image data requires de-bayering which is processor intensive. It is normal to decode to a lesser quality for the grade and only decode to full quality for the final export.
RED RAW files are known as .r3d files. They are known to Nucoda and open their own special dialogue via the properties tag.
Why do we need to color grade
There are several reasons why we color grade.
- To match shots taken at different times of day
- To match shots taken in different weather conditions
- To match shots taken on different cameras
- To match other source materials including archive
- To change the pictures artistically by giving the footage a “look”
Grading is like building houses
To build a house you need to go in a certain order; first dig the foundations, then put up walls, then roof trusses, and then the roof. Get it wrong and it will all fall on your head!
To properly grade, you need to get all your levels sorted using only the primary controls. Once you have a decent flat basic grade, then you can use the secondary controls to fix individual color problems. If you don’t do this, you will find that your secondary keying comes apart when you go back to adjust the primaries.
Primary correction
With primary color correction if any color is altered then all the colors in the image will be affected.
Primary color correction consists of:
Lift – the density of the shadow details
Gain – the overall brightness of the picture
Gamma – the density of the midtone detail
Saturation – the overall color level
Hue – the overall tone of the picture
In Nucoda, we can use the Balance or Lift Gamma Gain controls for primary correction. For log images we can use Color Curves.
Secondary correction
In secondary color correction only the color selected is affected.
It is normal to “qualify” the selected color with a key or shape to help isolate it. Any of the usual parameters can be changed: lift, gain, gamma, hue, and saturation.
In Nucoda we can use the hue curves to do simple secondary correction or in conjunction with the keyer or shapes, the Balance, Lift Gamma Gain, and Color Curves.
Adding a grading panel
Nucoda fully supports the Tangent range of panels. The Tangent ripple is an affordable entry level grading panel. You can find more about the ripple here: https://www.tangentwave.co.uk/product/ripple
To use the Tangent panels, you will need to load the supplied drivers and mapping tool. You can see a full video on how to set this up below
Link to Gustavo’s panel video once it’s moved to Filmworkz
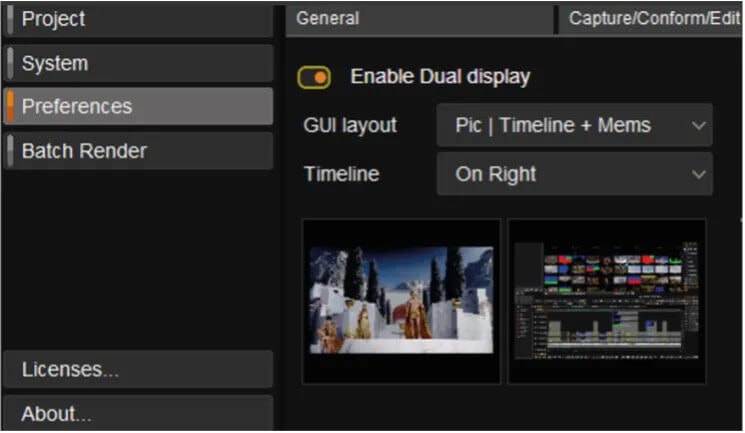
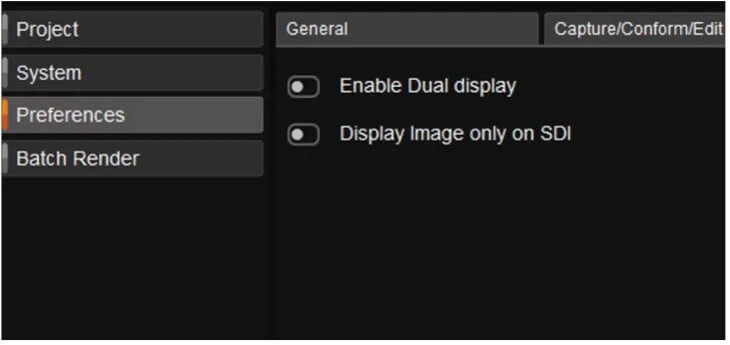
Setting up the displays in Nucoda
- Open Nucoda
- Go into Preferences > Video IO > Monitoring
- If you have two screens enable Dual Display
- If you make changes here, you will need to restart Nucoda before continuing
Log and lookup tables
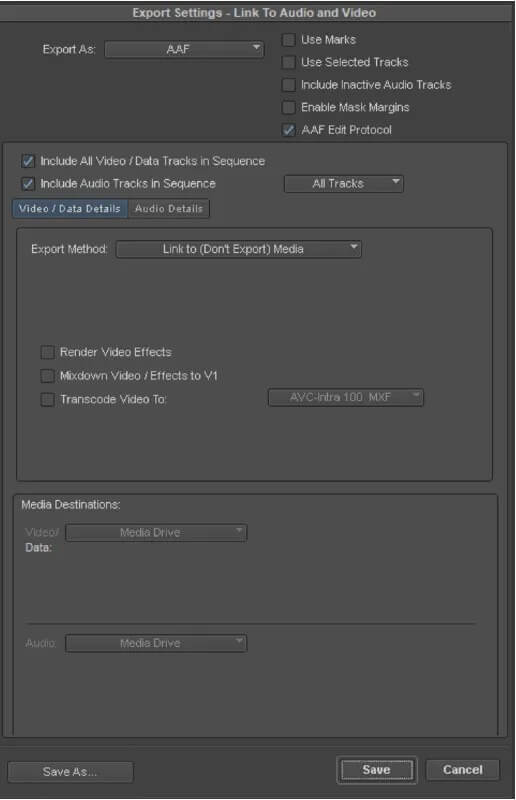
- Cut your sequence in your chosen NLE (note: here we’ve used Avid Media Composer)
- Export an AAF of the sequence (note: if you are using Adobe Premiere, export an XML)
- Open Nucoda
- Give your project a name
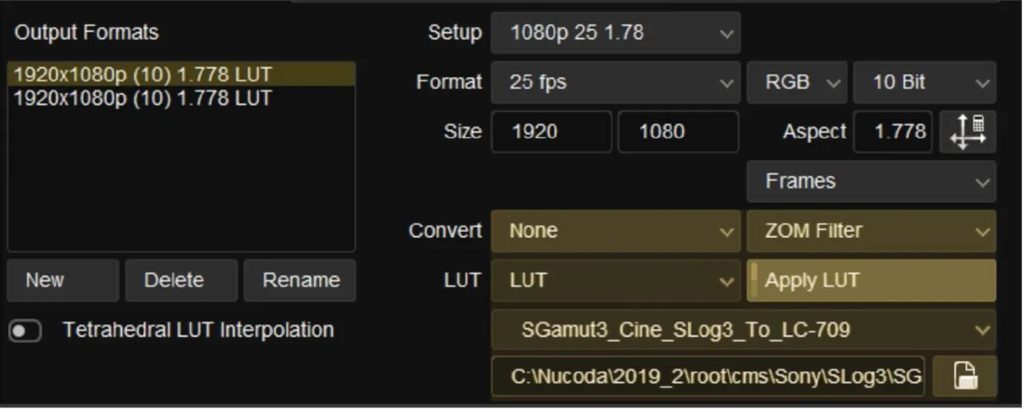
- In the setup box select the correct resolution and framerate of your material
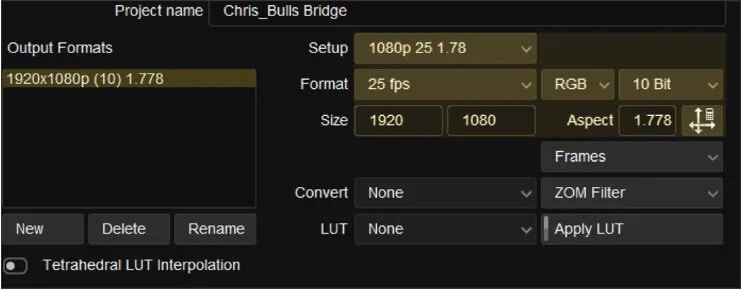
- Next select a color space for the project
- For simple Rec709 material use Video SMPTE
- For log material use Video Log
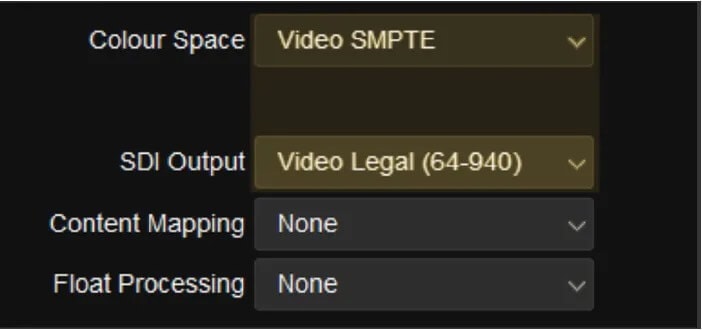
- If your material is log, select Apply LUT
- Below this, select the LUT you want to apply
- When you apply the LUT this way it will apply to the whole timeline
- In the Output Formats box you can clearly see a LUT has been applied
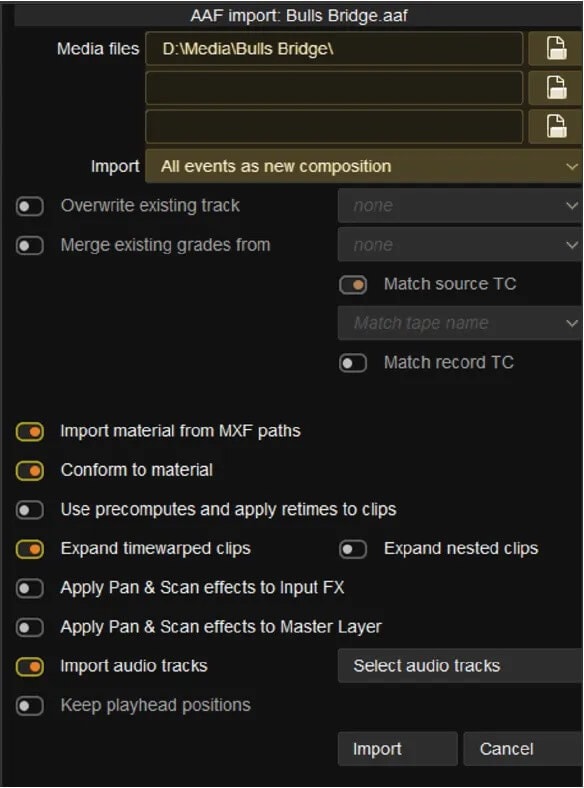
Go to Open Project and import your AAF file using the navigator
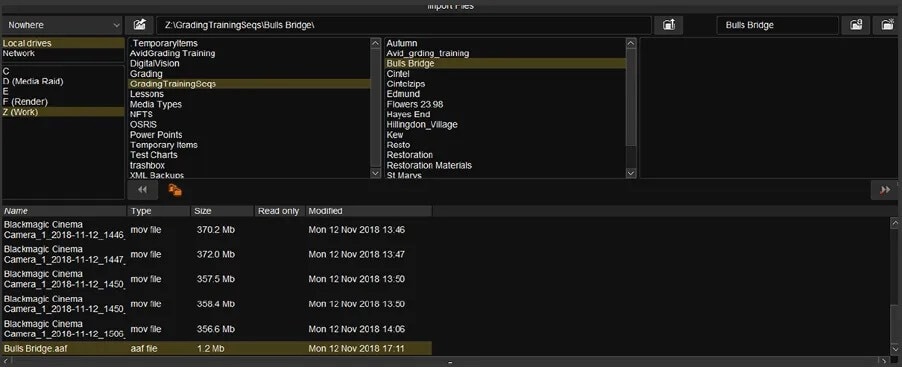
- Select your AAF and click Import
Setting up your grading environment
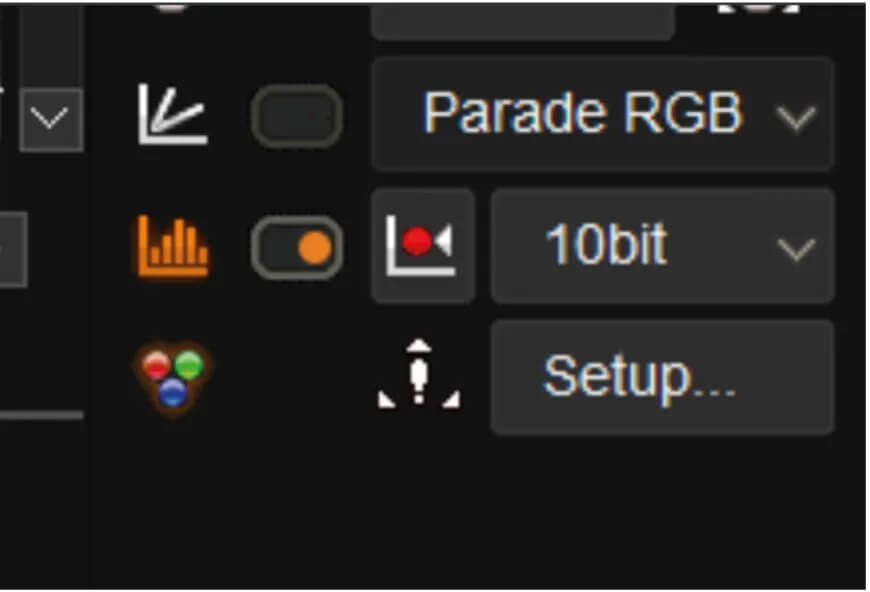
Turn on the video scopes to help you in your grade
- Select Mems
- If you’re using dual displays, you should get a picture on your second display
- If you’re using a single screen the image will appear in the top left
- If no image appears, right click and select Fit, the image should now appear
- Your scopes will be in the bottom left of the image
- Balance should already be selected
Grading your timeline
You should be able to scroll up and down your timeline using the mouse by dragging the A cursor.
Select your first shot. Now adjust the black and white to get good levels on the scopes. If the image is still too dark or light after doing this then use the mid to get a good image. Work your way through the timeline adjusting each shot so it looks good.
If the saturation feels too high or too low click on Saturation and adjust it to your taste.
Now you can work your way through making color adjustments to match the shots together. Remember, only work with primary correction at this stage. Once you are finished, play through your timeline to make sure you’re happy with everything.
To continue your color grading journey, check out the next post in this series: Color Grading 102.
